Wednesday, December 16, 2009

Resin: Flames of War style

For most of us in the miniatures gaming world resin is that exotic material just shy of Vibranium.   We work in gray plastics and shiny white metals.  Those nuts who buy ForgeWorld talk of soaking and rinsing, mold release, air bubbles and mix ratios.  Well, if you have ever seen the shiny gray tanks in those Flames of War blisters hanging on the wall, you have seen resin.  This article chronicles my experience with the Flames of War: Open Fire! starter set models (so far just the StuG G's, I'll update when when I do the M4A1's).

Any time you deal with resin it will start something like this:


That green stuff is Simple Green. Other times it gets soaked in warm soapy water.  The soap part being run of the mill liquid dish detergent, I think I use Dawn.  Like all resin, Flames of War stuff is sometimes shiny to the point of being unprimable.  When car primer wont stick, you know something is up.  This batch got soaked in both.

Resin is brittle!!! Mild agitation (I swirled it gently in the spaghetti jar) can lead to breakage as shown.


Luckily, resin is highly porous.  Because resin is a two part mix, even if it is smooth to our eyes, resin is actually very rough at the micro scale as the are tones of air bubbles and fine cracks as teh two luquids combine.  This means it takes very well to super glue as shown below.


As you can see, that chipped off piece of schurzen glued right back on there.  If only I have found the third little piece and fitted the puzzle back together again.  As a side note, when you superglue resin, the reinforced with superglue resin is stronger than the normal resin.  This can lead to uneven filing and sanding if you are not aware of that.

You will notice that StuG in the start set is two pieces: a resin body and a pewter gun.  Because of this, the underside is not only filled in with resin, but is channeled and cut in such a way as the model floats above its tracks.  Those Germans were advanced, but not so fast Adolf!


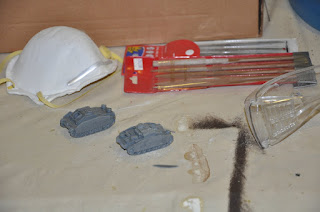
That is a lot of resin to file out.  Resin is toxic and spews dust every where.  It is cold and rainy outside.  Therefore I will cut my resin inside.  And therefore create a fine layer of toxic dust all over my basement?  No way.  Enter the Dremel and vice.   Below you can see how I mounted a vice with balsa wood jaw guards and scotch tape.  This allows a rather firm grip on the solid body of the model.  You'll want a solid grip for this next part.  Notice the white plastic bag to catch the dust.  That is key, otherwise you just making a bigger mess than filing it down by hand.


If you zoom in, you can see where I carefully cut a nice channel out next to the tracks.  The goal was the cut a series of these channels and then chisel out the remaining fins like so....


Instead, I was having so much fun, I decided to just grind that whole puppy down. (the picture is an intermediate step)


The key is , because of carefully Dremel usage, the vast majority of the dust ended up in that garbage bag, and not on the floor or floating around int eh air as it would have if I had taken a file to it from the beginning.

Safety First!  Despite having the dust going where I wanted safety is essential.  That dust is nasty, and Dremel bits are know to come flying off, as are chunks of resin.  Goggles and a dust mask are important.


A little green stuff to repair my over zealous nature with power tools, and voila!


Monday, December 14, 2009

Weekely Goal 10/24/2009

The goal this week was to strip, prime, base coat and do the ambush camouflage airbrushing on 5 Panzer IV Ausf. H medium tanks and 2 StuG G assault guns.  The panzers had been siting around for almost a year, and the StuG G's came in the Open Fire! starter set for Flames of War.  By Wednesday night, here is where I stood:


Thursday night I buckled down and did both passes of camouflage as shown below:


For the time being, they will stay like this, perhaps every now and again when I need a break, I'll do some work on the tracks or pick out the tools.  The track and tools are next, followed by the decals.,  the GW brown washes, and varnshing, then on to weathering.  In the meantime however Christmas is fast approaching and I still owe Ron a Painter v. Painter model.

Friday, December 11, 2009

Review: Malifaux First Impressions

I have been watching Wyrd miniatures for a while now, making sure to look over my shoulder ever now again to see if anything new cropped up (much like I treat Freebooter and Dark Sword).  A few weeks before Thanksgiving I had the chance to play a few learning games (I have multiple rules sets that I have never played, er... umm..., Flames of War).  So the following impression is based on play, although not full fledged skirmishes with all the bells and whistles.

The rulebook:
Malifaux rulebook is in many ways very similar to Privateer Press rulebooks- a running story across factions, great illustration, rules that make sense on the surface and everything you need in one book. 

As you don't use dice, there are a lot of easy to read two row tables to show what the various totals for cards mean.  One of the things that I didn't even catch until I sat down to write this review was, not once in the rule section, was there a figure for model positioning.  Unlike GW and PP games where you are constantly shown diagrams for charge lanes, line of sight, cover, etc, Malifaux means everything off the base and height values so those drawings are not needed.  Can this model? (Answer: I dunno, can you draw an uninterrupted line?).  There has been substantial errata posted on the website forum, and this appears updated routinely.  Most of the rule errors are simply grammatical.  The faction/model errata is where the significant changes occur.  Some of them I caught reading the book the first time, for instance, why was the generic Guild Guard a Unique member of the Family.  I wager in two years we'll get the Infinity treatment, and get a really polished near perfect revised rulebook.

The actual production value of the book--written and illustration, and even layout-- is very nice.  The fiction starts with nice overviews of the grim Victorian characters showing primary role.  When it concludes, you feel as if you get just enough to realize how open and desperate the world of Malifaux is.  Very little has purely good, and near everything has the taint of either evil or malice.  From the simple line drawings to the full color chatper pages, the art is of premium grade. 

The missions are highly varied, and the system even allows for secret objectives.  One of the things I am always interested in are asymmetrical object based scenarios.  Malifaux has a random primary objective (a strategy) and optionally, secretly chose secondary objectives (schemes) at the your own, not the game's, discretion.  So you might very well in up with defend an objective with one crew and kill their leader on the other. Further terrain features heavily into most objectives.

The models:
They have a strange Weird West- Steampunk- Victoriana flavor.  And it works.  Models are 28-32mm, but not heroic.  No elven archer hands here.  Some of the earlier models in the range are nasty to put together, having very fine chains or wrist joints.  New models are often single piece, or hidden joins.  In quality, they are comparable to Infinity in so many ways, including assembly.Recently, more single piece models have shown up, and they are very well done.  A little twisting of an arm with padded pliers, and you can completely remove the flat effect which single piece models often suffer from.

The game play:
I have only had a few games, mostly just moving Lady Justice around for a charge on Saemus.  The game does play fast.  There is a resource allocation system, soulstones, similiar to Warchmachines focus mechanic, with major exception-- you only get an initial alotment, they don't come back every turn.

The game a feel similar to low model count Warmachine.  Flip cards, add, compare.  The twist and cheat (which are the actual game terms for it), is swapping cards from your hand to with those in play, or using a soulstone to add an additional card.  Additionally, all weapons have ranges, even melee weapons.  So the base to base contact isn't as crazy as in some games and the rue melee monsters, have much longer melee ranges.   Damage actually scales based on a damage flip, with no damage always being a nasty 1/54 chance (flipping is the card equivalent to a dice roll).

So that is my quick first impression of Malifaux.  As I get more time to play more meaningful games and paint up some models, I'll be sure to come back for a more informed impression.

Thursday, December 10, 2009

Mid-Week Update for the 12/13/2009 Goal

Okay so the stripping, scrubbing, priming and base coating are done.  So the StuG III Gs are at the same phase of painting as the Panzer IVs.  As I have now learned, they were not as originally thought StuG IVs, remember count the road wheels, divide by two (or read the contents of the box).  The Schurzen (side skirts, i am too lazy to figure out HTML umlaut code) are back to a nice German Yellow (dunkelgelb) after undoing my first attempted at Ostfront camouflage.


Here you see the spaghetti sauce jar getting pressed into service of the Reich.  There was also a round of soaking in Windex.  I had horribly botched my first attempt at camouflage, and the Schurzen needed redone from scratch.


Here you see the results of cleaning the StuGs.  The Schurzen of the Open Fire! starter set are molded, in resin, directly onto the body of the assault gun.  Thin resin, plus the occasional shake and scrub led to the broken plate you see on the left StuG.

Battlefront makes the vast majority of their armored vehicles out of a very brittle resin compound.  In the mainline kits, these have numerous white metal and, in some cases, plastic components.  The Open Fire starter set StuGs, however, are single piece resin (as noted above) plus a white metal barrel.  the normal StuGs and vehicles are resin cores white white metal tracks.  Why is this important?  Look below....


On the right, you get a nice view of how the resin tab protrudes beyond the bottom of the tracks, causing a floating in scape look.  On the right, you can see how the tab for a normal kit Panzer IV Ausf. H is much smaller as there are not tracks getting int he way of it being cut close to the body.  Originally, I was just going to do the models "straight out of the box" but the broken schurzen and the floating tank syndrome were too much.  So while I am not using my extra tank stowage bits, those things are getting


So some time in the vice and a little green stuff to correct for operator error the cleaned up, I present the StuGs with more ground clearance than a Corvette.


Here you can see the quick repair of the broken resin schurzen via some plastic card and some more green stuff on the bottom of the StuGs. The card blends in decently for as slap dash as it was done. Once built and painted and weathered properly, it should look a a little disjoint as schurzen were separate plates in real life.


Primed and mounted and ready for base coating.


And now the whole family assembled for a group shot now that base coating is done.

As a side note, Menoth White Base is a great touch up for my recipe for Dunkelgelb. Tonight I put on the Reflective Green and Red Brown primer the Germans used for camouflage.

Hopefully, I'll be posting a small tutorial on how to Dremel resin, as it isn't as safe as one would think.

Monday, December 07, 2009

Project of the Year

So that whole Christmas, New Year's, time of reflection and planning thing is starting to set in again.  While the Skorne seriously kicked me in the teeth as far as scheduling went, this blog has been pretty good about keeping me working towards a goal.  I am painting models that have been laying around forever (trust me, eight models of any quality in two months is a big deal, particularly when Thanksgiving is factored in).  I am already figuring out what my next few sets of weekly projects will be (mostly stuff already on my bench off it).

This led me to thinking of a Goal of the Year.  Something grandiose, but still attainable.  Something, like my original Shadowsword, that will push me, but not rush me.  Something I know is within my skill level, but at the very edge.  Something that I can not only be proud of, but will also get seen and encourage other people.

I used to help make a Games Day table for Big Gunz  DC.  I love large scale projects and planning.  I love teaching youth and catching their hearts and imaginations on fire.  I have been mulling over some ideas recently and here are the options I am looking at with pros and cons. 

Here is what I have come up with so far:


ForgeWorld Warhammer Fantasy Fire Drake (occasionally referred to as the FW Emperor Dragon):  Some avid games don't even know the thing exists.

Pros:
1.) I already own it.
2.) It is absolutely gorgeous in a weird draconic way.
3.) Clearly within my skill level, but doing it justice will take everything I have.
4.) Large base size means it will have serious scenic/terrain element possibilities.

Cons:
1.) Odds are it will never leave my basement.
2.) Odds are it will never be seen in person by more than a half dozen people (although it would obvious get photographed and posted here ad nauseum).
3.) It will never get used for anything other than a show piece.


ForgeWorld Death Korps of Krieg Super Heavy Battalion:  I have actually used it for Apocalypse games in its unfinished state.  Building all the tanks was actually Project of the Week number 1.  My Super Heavy Battalion is rather large. 5 Baneblade chassis, 5 Macharius chassis, 1 Minotaur, 8 Leman Russ chassis, 3 Chimera chassis, 3 drop Sentinels, and Thunderbolt Heavy Fighter.  Oh, and some supporting infantry.

Pros:
1.) It is already started and I know exactly how do complete it (even have a finished prototype)
2.) It has left the basement and seen LGS play already, in a limited scale.  It will again.
3.) Everyone, including myself, loves DKoK.

Cons:
1.) While easy to do in chunks, those repetitive chunks might wear on me.
2.) I plan to do a large number of smaller Flames of War projects, and might go into tank overload.


Loyalist Terminators (7-10 squads from different chapters):  I have tons of Terminators.  I've got all the FW shoulder pads, two copies of Space Hulk, new Space Wolves plastics and the old FW Space Wolf Torsos.  If wanted to go overboard, I even have the matching FW dreadnoughts where applicable (or even Land Raiders).  Imperial Armor VIII is Raven Guard, so there will certainly be a Raven Guard Dread and terminator set (even if it is just shoulder pads).  Space Wolves get their dreadnought early next year.

Pros:
1.)  I already have most of the models.
2.)  Terminators are fairly easy to paint, and I prefer closed helm versions.  I have painted Terminators and know what I am doing so that I could do quality work on one squad a month or so.
3.)  A chance to paint models in pre-defined schemes across a variety of palettes.  More of a technical challenge than an artistic challenge.
4.)  If done well enough, I can probably sell them at cost in chapter chunks (never above cost, I like my status as an amateur).

Cons:
1.)  70 plus models when factoring in making some leader types.
2.)  Like the tanks, I might just get tired mid way through squad 5.


The Battle at Weathertop: GW is re-releasing the 16" diameter FW model for the Battle of Weathertop from The Fellowship of the Ring.  Some of us have seen the smaller 1/2 ruined piece in GW stores.  This is the full piece, near identical to the movie set.

Pros:
1.)  I get to buy limited release Forge World and I already own the LotR boxed set for the battle with Aragorn, hobbits and Ringwraiths.
2.)  It is a terrain piece usable in many games.
3.)  Ideal for small scenarios games with my Youth Ministry work over the summer.
4.)  Potential to take to Games Day if my club every does that again for a club type table.

Con:
1.)  What do I do with a 16"x 16" chunk of terrain when I am done?  It is getting kind full under the pool table.

Saturday, December 05, 2009

Goal of the Week (er, um, month) for 12/05/2009

This project for whatever reason was a bear.  It was the perfect story.  It was project more complicated than imagined, in a very busy time period with multiple interruptions.  Dragon Age: Origins soaked up hour upon hour, Thanksgiving kept me cooking, the whirlwind trip across the North East actually kept me away from painting. At some point I became simply disinterested as newer and more sparkly things arrived.

But they are painted.  Not based or weathered (which will require selecting a base style).  I have to remember these models were never intended to be my best work, and were to simply be painted so I could continue my holier than thou anti-playing with primed model attitude.  (I have since relaxed it a bit.  I will not play with new models for a system, until the ones I have are painted.  This only works for smaller systems like 300 point Hordes, Infinity and Malifaux).


This is where I was on the 13th of November.   Things don't look terribly different, but there are some subtle differences, mainly in that the banner poles are attached.  You'll also notice, I got much beter with my camera zoom, just in time to show all kinds of tiny defects.  Perhaps the most egregious of them will be fixed when a base and weather them.

Cyclops Savage No. 1, painted and varnished.
You can see that I had a really nice free hand Skorne symbol on one side, and a not so nice on the other. I can do really nice "one off" free hand, but not so much when it comes to replicating it. Something to consider if I start doing Celtic knots and such for Eldar or whatever. You'll notice a slight discoloration or fuzziness at where the banner poles connect. After too many issues with those annoying poles, and being to far along the project to do much, I decided to simply epoxy them when done. Next set of back poles get brass rod shafts, and wire loops bulked out with green stuff for the harness. This was just a "get you by" trick, that isn't really all that noticeable.


Cyclops Savage No 2. Painted and varnished
You'll notice the simpler free hand pattern on this guy. Rather than copy something (the Skorne scorpion symbol), I simply started carving up rectangles until I got something I liked. Not a perfect copy by any means, but a learning experience. When you simply don't care, and are looking for ways to speed up certain steps, these kinda projects are great for that.


Titan Gladiator, painted and varnished
Every time I picked this guy up, I found something new to do. In fact, I can list of about five things now that I could easily fix (and probably will when it comes time to base him). This guy is really my first "finished" model with interference paint. That purple sheen is really there. I used that "flip paint" you see used as an additive to car paint. One tube the size of your basic Delta Ceramcoat or Americana craft paint runs about $11. Generally it is used to via airbrush, but because of the order I painted the model in, I ended up mixing up a brush formula. While expensive, you have to remember it an additive, but a paint base. A blob the size of a pea was enough to glitter all fourmodels, and have enough left over to probably do eight more. After varnishing satin, I went in by hand and glossed the purple glittery enamel.

These models were actually the first time I ever used GW's inks. The gold is PP Rhulic gold washed with Sepia and a second wash of either Black or Mud depending on which ever one I grabbed that day. After that was dry, I dry brushed the metal again.

Personally, I am not pleased with the off white/blue shading effect I got on the white parts. Even when not zoomed in, it still looks splotchy. i thyink I should have done it all off white, hit with white powder and then varnished it, using the white powder to form a white highlight. Too late.


Morghul, painted and varnished
This guy has been done for several months now and was not really part of this project. When I get to basing him, all four pieces will be done at the same time. You can definitely tell I learned how to use the manual focus on teh macro setting with these pictures.


So til next time.