Friday, June 01, 2012

10.4%...

At least that is what iBodger is telling me concerning my completed Cryx models.  I actually made a good effort and haven't been to Game Vault in 2 weeks, and probably wont be there until the 9th, to unload stuff at a swap meet (tons of Skorne).

So here are things I have completed....

Dr. Venethrax will see you now.


And the start of his crew...

  They turned out, I will admit there is way more detail than I originally thought on them.  I have to have 20 of them for 35 pts, so I have another ten to take what I learned and improve on it.  Under way are teh Seether, Skarlock and General Slaughterborn.  Slaughterborn and Skarlock should be done by mid-June, although with the end of the quarter approaching they may get punted back a little.

My goal is to get 35pts of Venethrax tier 4 done by the time the new Ashlynn model and Galleon are released for Mercs.


Also, I have been having some fun with photography and found this guy in my back yard...

Thursday, May 17, 2012

Bloodgorgers....

Okay, so I haven't super painter man recently but I have been working on something. These Bloodgorgers despite being generally a "cover it in wash" model have turned out to be ultra detailed for basic infantry.

I still have to start picking out the spikes and rocks in their skin, but I am slowly getting there. Once those are done however, I have to do 10 more of the buggers.

Oh, and here is a finished Venethax. I used the word venom in Cryxian hieroglyphs to mark the front arc. Ironically, Venom is not one of his spells but had nice verticals to mark the center and edges with.


Sunday, April 29, 2012

Been a busy two weeks

... But I had sometime to get some painting in. Here is Venethrax and his ten beasties. Venethrax is almost done, needing just the facing arcs and touch up before sealing. I think I will them as cryxian runes with either off colors or strong vertical lines for the ends of the arcs.

This batch of Bloodgorgers is my first experiment with the GW washes. They feel slightly different, but results as about 95% of the old ones. Nuln oil seems very close Badab Black, but the replacement for Delvan Mud lacks a little something, seeming more like burnt umber wash than "dirt in a bottle". This batch of Bloodgorgers is being done following the scheme shown in the trollblood book for the earth born troll whelp.

After the Bloodgorgers and Venethrax, next comes a Seether, skarlock and the big boy himself General Gerlac Slaughterborn. That combo will be my go 15 point list. 35 will be more Bloodgorgers and another Seether.

Friday, April 13, 2012

Training Games...

So why haven't I been posting? Well, I have been teaching someone how to play Warmachine. One of the more interesting things about is just how important scenarios can be. Here you can see my painting table converted into a game table. Notice the big red lines of yarn? Those really help focus and remind a newbie that something more than caster kill is going on. Actually, as an experienced player I find those nice bright lines pretty nice too. I really wish tournaments had clear lines like that. Actually, for the Steamroller scenarios that have smallish zones , I think I'll make some bright templates.

Thursday, April 05, 2012

iPad as a blogging tool

So sometimes it is a real pain to get the camera out, take picture, download the picture and write a blog post that is not very long anyway. So now I am trying the iPad as a quick blogging tool. Here is the current state of my Warmachine game on hold. Also shown is 1/2 finished GW terrain I bought the week it came out. Once finished I'll take decent pictures. Suffice it to say, you go through a lot of wash which led me make my own.

Thursday, March 22, 2012

Cryx Battlebox Finished!

So I finished my Cryx Battlebox a few days ago.  Having been busy with work and the cherry blossoms, I haven't had time to take nice pictures, but for now, these get the point across.  The auto-focus on the camera really loves the OSL, so the they are bit blurry.  As a side note, I finally found orange ink from Liquitex making the this a bit easier int eh future now that I am getting better at the OSL.


Thursday, March 15, 2012

More Cryx Battlebox...

Okay, so despite it being 84 degree, sunny and breezy out, I am having a miserable time and hiding indoors.  I am allergic to pear tree pollen and having a heck of a time breathing.  Despite being cheap when it comes to AC, I always run it during this time of the year just to filter out the pollen.  Being 84 is also uncommon for this time for the year.  While in the basement, I decided to finish the pre-sealing work on my Cryx.

I telling a guy I was training, that eventually you just have to stop working on a model and move on-that you'll never really improve my just painting and then correcting the same model over and over again.  Well, that applies to me as well, and I have been doing a lot of experimenting with these guys and that orange glow, and the blue fades for color theory.  Time to move on, or I'll just ruin what i have under layers of ink.  So here we go.

Group shot, you can see I deliberately upped the blue content in the big guy.  Remember I haven' t Photoshop'ed these images, so the blue are much brighter than in person.
Denny's orange glow is coming out really really well.  The finger glow looks much better than expected.  Once the whole thing is matte varnished, hitting that with gloss should make it really pop.
Big Blue, who is not that blue in person, but the orange and blue work really well together.
Now, due to the high pollen count and not having having a nice matte varnish handy since Hobbytown closed, I'll probably airbrush the sealer onto these guys after a quick pass looking for anything  like accidents with white paint or scratches.

Next up, will be matte sealing, then spot sealing with  satin and gloss to highlight various spots.  Then some oils (or gloss and ink mix) to the inner pistons.  After, static grass and and other scenic elements. Then done!

As a side not, I got my hands on USB 3.0 card reader, and boy does that speed up moving the files off my memory card. The tethering cable from the camera to the computer was brutally slow.

Monday, March 12, 2012

Swapmeet observations

So this Saturday I went on the epic journey to Fredericksburg to a gaming swapmeet.  Now, I knew there would probably not be a ton I was interested in since college was we well under way and the economy has been down for quite a while.  I tend to place more of the niche games and really hate stripping model, so it was more of a "something to do on a Saturday" kinda thing.  Also, if I saw an Cygnar, then I would pick it for a friend. 

When I get there, first thing I see is the entire set of Ravenloft from 1st and 2nd edition.  Cool, but I passed.  Saw  stack of Rhulics, which went in under and hour.  Some poor schmuck bought, units of 5 of each kind of bane for Cryx (they are fielded in units of 6 or 10, and no longer sold as blisters).  After that the only PP stuff was a few metal Circle models.

What was left?  Tons and tons of GW products.  Blood Angels everywhere you looked.  Poorly painted Ultramarines as usual and the occasional IG models and grab bgs of 'gaunts (not any particular kind though, since they didn't have arms).  Some guys was unloading Sentinels and mid-sized bugs on sprues.  So over all Mostly it was GW meet, the only problem being none of the stuff was moving.  Now I know everyone and their uncle has more space marines than they know what to do with, but it was really depressing.  No excitement, or "Hey look at that!"

I did walk out with my new hardback FoW 3ed book, but I bought that new.  Oh well.  Back to more painting and LEGOs later this week.

Thursday, March 08, 2012

Update on the Cryx Battle box

So I have been slowly chipping away at that Cryx battle box(actually A bad term to use for painting, since chipping is the last thing I want).

Here you can see all 5 models, not particularly in focus.
Family portrait.


Here is a close up of Deneghra's cloak as I start blending up from Cryx Bane Base to to the Highlight and maybe a little brighter (although I am not there yet).
Actually that bone jack looks better in teh picture than in real life...

As I have had a mental block in painting the Slayer, I have been going back and starting some of the foundation work for the bases (get the pun, foundations, bases, I am so ...ummmm lame).

I used piece of square Acrylic sheet (or plasticard if you will) to make blocks, and then for the Slayer, glued them all together to make a platform.  The end goal is hopefully going to approximate weather white marble.  Maybe not, but here is where I am at half way done.

Please turn to the left.

One of those weeks...

Which kind if week?   The kind where Mass Effect and A Game of Thrones (BlueRay) come out.  Actually, I have been doing some work on the Cryx battlebox, getting the bases underway and highlighting Deneghra's skirt.  For the most part, the "model" part of the bonejacks are done with onyl soem clean up work left.  The Slayer has a long way to go, and for reason I am just having an aversion to working on it.  But I am doing good, in that I am not starting any other models until these five are finished.  I might do some priming today, but that is due to it being a gorgeous day to today.  I think changing my brakes is important.  Last time I put that off, I had to buy new calipers and rotors.

Friday, March 02, 2012

Heavy Gear FS finished

Family Portrait
So there they are the Jaguar, 2 Hunters and 2 Grizzlies.  I have to say, that they were more of a pain to build than I thought they would be.  The Grizzly in the back had its left leg broken in two pieces from poor packing.  Additionally, getting the arms to line up nicely on the little guys rather annoying.  I am still not happy with the Hunter in the front left.  It was my first experience with DP9, so hopefully as I get used to their construction, I'll will become easier.  Still, they were better than Nyss Hunters.

Tuesday, February 28, 2012

FoW: 3rd Infantry Division

So being too weak to actually paint or build models (that second Heavy Gear: Blitz! Grizzly with the broken leg is giving me fits), I decided to photograph where my 3ID is currently (Army, not Marines for those not into Flames of War).  With the release of a new rule set, hopefully I'll get a chance to play.  In the near future, as local gamers whine, waffle and wait for 40K 6th Ed.

M2A1 105mm Howitzers Field Artillery Battery
So the 105s are one of the thinks that make a US Rifle Company really work.  Why?  They lay smoke, and smoke hides infantry!  In 2nd edition, this was really important, in 3rd, we'll see if the importance lessened any by how much easier it is to stay gone to ground and concealed.  Additionally, now that moving artillery isn't so painful, maybe that will happen too.

One team on front view
A different team on rear view.

M1 57mm Anti-Tank Platoon
These guys seem to be overly hated by German armored cars and Panzer IIIs.  I mean, they only 1/2 the time and cost 100pts.  Oh, ya... obligatory 4 bazooka teams not shown...
Nice impression of the # ID patch on the shoulder.  Light Grey with Blue liner pen.

Weapons Platoon
These guys shoot a lot.  Sadly the M2 60mm mortar does not fire a smoke round.  I do believe those M1017 HMGs get better in the new version though.  I never really had them do much.  Being able to shoot over my own units should help a ton.

Sample of my infantry teams

Proof that GW Badab is truly, liquid talent.
I play an Infantry Company so I have lots of these buggers.

And here are some shoots of what I have done, what is started, and then what may never make it out of the box.

Here is everything I have completely painted and sealed.  Handy little force for fun games.

Here is the work in progress.  Those big guys in the back never actually entered production in the real war.  I hear they made it into World of Tanks.

And everything else... Close ups of the stack below.
And here you can see what I exactly all that other "stuff is... Mostly stuff for Late War, since well US Infantry doesn't get any better.

I like to stack things, it makes my laziness feel more organized.
And blisters, Oh My!

Food Poisoning

... really impairs your ability to hold a paint brush steady.  I wont even dare to mess with the airbrush in my state.  Ironically, this is the healthiest I have been on my birthday in years.  Perhaps this is a good time to get the light box out and photograph so stuff I have painted in thr past two years.  Did I actually paint anything int eh past two years?

Thursday, February 23, 2012

Heavy Gear: Blitz! -Part I


I bought this.


So in a random fit of curiosity, I started looking into Heavy Gear: Blitz! (HGB, for short).  What is it?  It is a miniatures game set at 1:144 scale for (primarily) combined ground force combat.  The stars of the game are vehicles known as Gears.  They are capable of walking for well, for a lack of a better term roller skating across the surface of the far away and basically abandoned planet Terra Nova.  I like mechs, and was looking for random stuff to add to my cart on The Warstore and well, things just proceeded from there.

I will say, that I bought a copy of Locked and Loaded v1.1 (the rule book from 2009) some time back.  So I had read the rules once, and then became engrossed in the fiction.  I knew that a 3 gears on 3 gears two player intro was near useless, so I decided on the Northern Army Starter Kit.  It is a jam packed box as we'll get to in a bit.  The outward presentation is top notch.


 Here is the back of the box explaining in a nice clear type what is in the box, and how customizable it is.  Kinda handy actually.  That weapons chart there, is way more helpful than you can imagine at this point if you have no experience with HGB.


The sides of the box are given over the description and pictures of two of the three chassis you'll be assembling (a Jaguar and  Grizzly, poor Hunter got left out).

So what is it like opening a box? Well, first be aware for its size, it is pretty heavy, you get tons of stuff.

It all fits inside tightly.

Really simple, but wholly functional packing.
Now yo see that white slip there?  That is pretty much the only guidance you get.  Why two rule books? Well, here is the thing... That green and black rulebook is the complete, up to date rules set (with some extra handy stuff like errata to other books, etc.) and that pretty orange one is the old rule book with all the army lists for the main factions in it.  So from a value perspective, you get all the information you'll need.  The rule books are black and white, and sometimes the things that should be in color translate to grey scale very poorly and are very difficult to read.  It turns out much of that information is readily available on their website, but as a total newbie I didn't know that.  Actually, Dream Pod 9 (the manufacturer)  is approaching a Corvus Belli (Infinity) level customer interaction via the website.  The website however is not in the box.  They do heavily encourage you to go there on that white slip.

You also get two trays of five gears (one a Strike Group, the other a Fire Support Group), 2 dice and a little round tape measure.


The metal making the box so heavy.
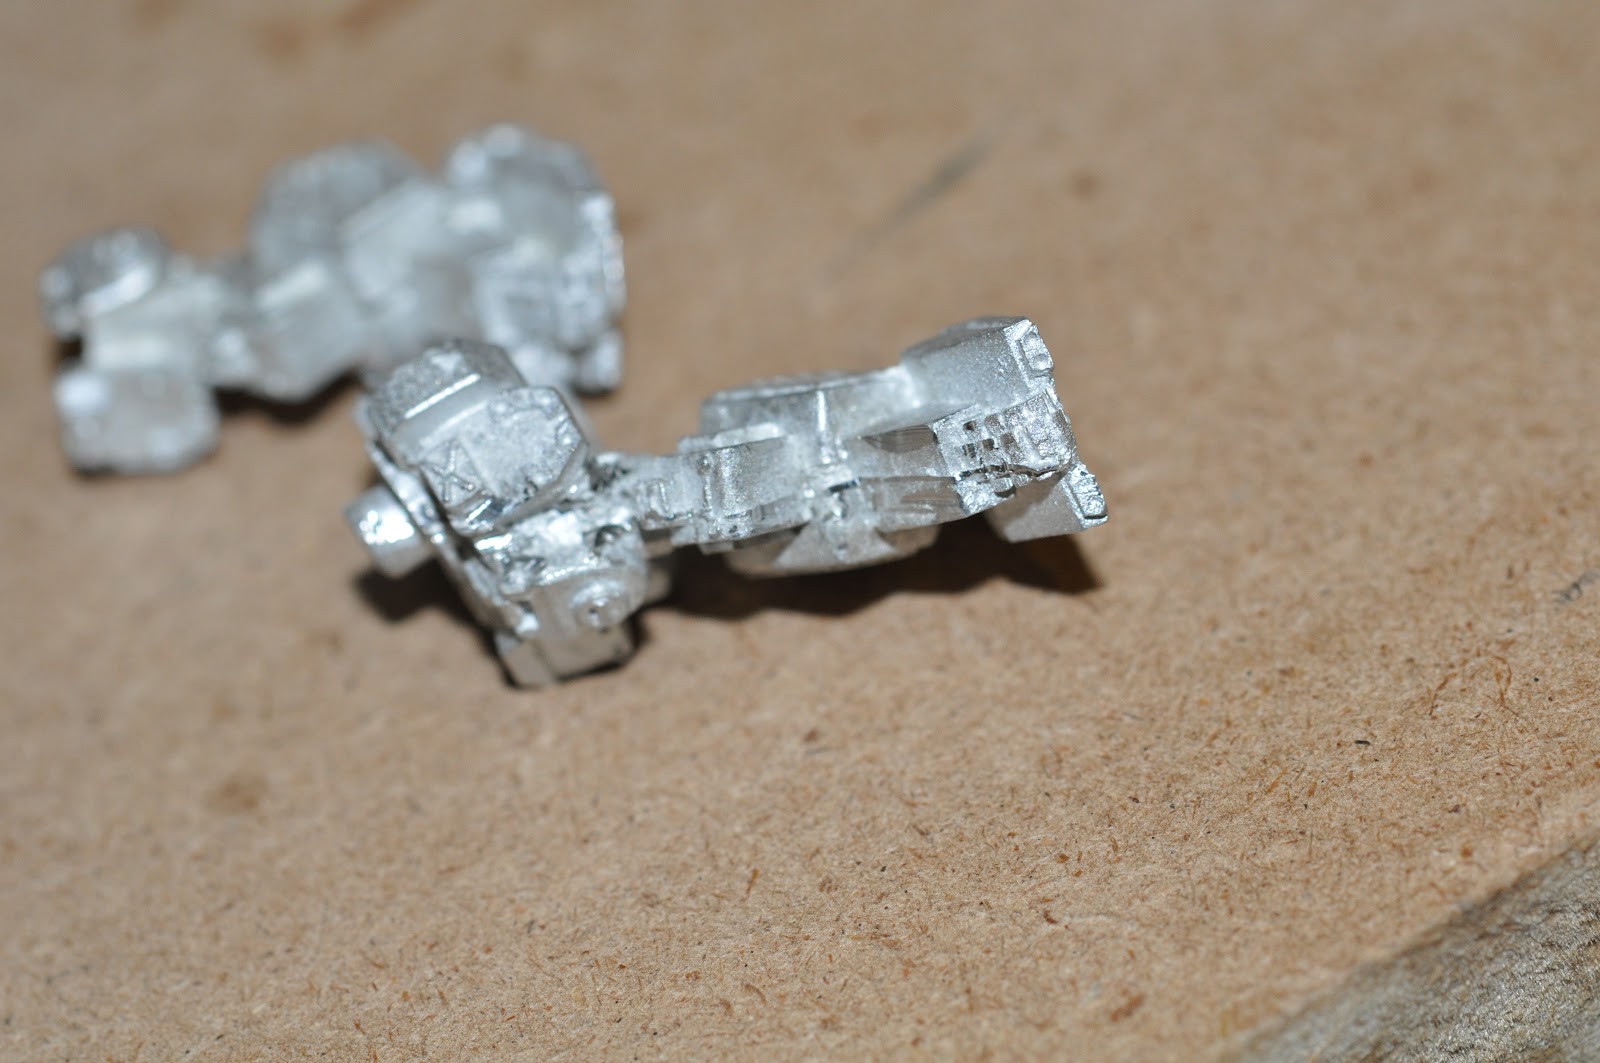
 The gears' chassis themselves come in 5 or so pieces, with weapons and accessories adding a variable amount based on load out.

A grizzly Chassis (top) and a Jaguar Chassis (bottom).

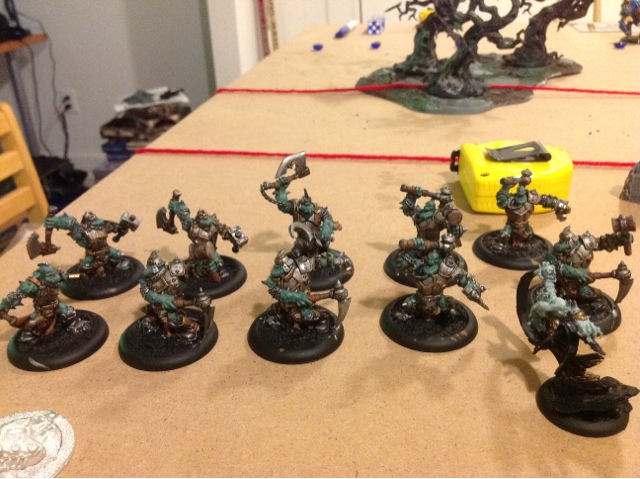
So I decided to build the big guy, known as a Grizzly.  As I understand, these are the big guns of the Northern Coalition.  Their little data card is chocked full of stats for weapons, everything from a guided heavy mortar to a vibroblade.

Bits o' Grizzly.

As far as molding goes, it was a mixed bag.  The left leg was flawless, while the right legs had a nasty mold line right down the treads on the foot.  There was also some mild mold slippage on the same treads.  The rest of the pieces where fairly standard in quality, nothing glaring bad, but still required some attention and mild clean up. (Update: I decided to build the second Grizzly last night, and the leg had actually ripped in half at a thin joint, probably from being a space too small for it.)


After how many years of fixing GW and FoW treads, yet another game that has my pet peeve.

And other shoe drops...  proof they can in fact do it right.

So using my awesome modelling ability, I overcame these insurmountable difficulties and built a model just to see how it goes together and get a real sense of the scale.


A gadget for every occasion, see what I mean a real walking arsenal.

So the body of this thing was easy to build, as it has nice sockets and pins for everything to fit together.  That is when I cam to how to arm this thing.  Obviously you can't equip all that stuff at once, well that actually isn't all that obvious, but you can't.  Having no idea what exactly is good, or well rounded or what not I decided to build a stock Grizzly.  So off to the data cards in the back of the book.
(Update: it turns out, the white slip of paper actually recommends a congiuration for the Fire Support team)


Not for the visually impared.
 That little block of stats is what you have to go by, and in decent light in my basement it was hard to read.  The fact that it is dithered grey scale is think contributes heavily to that.  it turns out you can get nice full color cards for with this data from their website for free to print out.  That is awesome, actually; but, as a newbie I am just excited and building models with minimal direction.  So after return to the back of the sleeve, I find all those little parts except the thing labelled HMG.  HMG any war gamer will assume means heavy machine gun.  So I get out my Field Manual to confirm that I am correct, then I go looking for a picture of it.  There is an expanded reference with every weapon in the game in the Field Manual.  Not there.  Hmm, after a while I discovered there is an integrated HMG of the lower right torso.  Okay, so I lost 10 minutes of my life, but I gained an appreciation for how stuff works in this game.

Don't throw this away, you'll really need it when you start.


The hand weapons are added using the time honored tradition of chopping off the handle and placing on a closed fist that we all learned back in the day on our 1st-3rd edition space marine, and numerous conversion packs.  The main different here, you are glueing a very narrow tab into a very shallow slot.   My heavy autocannon thus droops a little, but given that it isn't really being aimed like person would it (the gear just carries it, and the fine adjustments are all done via senors and computers), I don't think it is a huge deal.  If I ever really get into this game, I'll probably go back and modify it.

So  I started with this...


and ended up with this...
These models are shown to scale, otherwise this would be a pointless picture.

So there you have it, the basis for my initial impression of the boxed starter army.  So here is my actual impression.

This is not for a wargaming newbie.  For many of the basics you are on your own.  The models will require some detailed cleaning, and installing the weapons systems will require rudimentary conversion skills.  Trying to determine weapons loadouts are difficult, but clearly doable.  Working you way better Feild Manual, Locked and Loaded (which contains obsolete rules in addition to the current army lists)and the internet can be frustrating and counter intuitive.  Really that white sheet need to be double sided or better yet a nice getting started pamplet explaining more.

For an experienced wargamer, things are different.  This is a god kit for the educated consumer.  Go online and read about what is in the kit, so when you get it you'll not be dazed by the "new and shiny".  Read the manual, learn the weapons and lay everythng out above and you'll generally be fine.  They give you tons of weapons options, so you can get the set, and reconfigure everything later.  This a very much a bits box game, and so far I have tons of left over stuff.  Maybe it will be like how everyone has tons of bolters laying around, I don't know yet.  The models themselelves are varied, adn with some planning you can mix and match the arms or do soem minor conversions to get some reallty nice poses.

Tuesday, February 21, 2012

Glowing Chickens and a not yet dead chick...

So I have slowly been puttering away at my Cryx battlebox.  Are they awesome, not hardly. In fact now that I am looking at them under a harsh flash, they look terrible (actually I am running the flash through a diffuser box, but anyway).  One sure way to ruin your self esteem in the painting world is take up close photography.  Maybe I'll do a post on the pro and cons of self photo critique later.  What looks to the normal eye to be a decent start on blending looks like sports black or a watery paint mishap.  However the lighting int eh basement is so bad (and yellow tinged) the flash works well enough until I get out the light box, and have a little more control the photography.  I have a hunch, it will still look terrible though.

Here is the group currently.
Denny is all her unfinished glory.
I play football.
Seriously though, this Stalker is only in the beginning phases of highlighting and blending.  The massive blue blotches on the head are barely visible to the human eye.


Here are the orange painted and green inked ones.  I have started the highlighting  and some of the touch ups.


Amd here is the orange inked bad boy.  I am not really happy with how he turned out though.  Since I had to mix custom orange from red and yellow, I didn't really get the color I wanted.  Inks when concentrated look nothing like what they turn out to be spread on white paint.